Wednesday, August 15, 2012

"Steadfast" 2012

After seeing how well Tête-à-Tête came out, my wife suggested I do a similar piece - a couple on a teeter-totter. It took a while to figure out the mechanisms, which is basically there to keep the figures upright. The see-saw motion is pretty straightforward, but getting the figures to move correctly was a challenge.

Click on images for a larger view. The movie is at the bottom of this post......

The final shot of Steadfast.  It measures 30" x 21" x 6 1/2". 

The female figure. The handlebars, and the rest of the mechanism, keep the figures upright as they move.

The male figure. To get the legs to move realistically, I added a small amount of lead to the shoes. I also added a tiny rare earth magnet to make sure the shoes didn't move around when they hit the floor. The floor is metal by the way.

A detail shot of the center piece. I know I could have done a simple wood or metal center piece but I really wanted to make something fancier. I really like how it came out - light and airy.

The two bodies in-progress - much carving lies ahead.

The hands, carved and ready to be added to the arms. The girl's hands are slightly smaller than the guy's.

The arms finished. All the arms had to be exactly the same length, and all the pivot points the same. The girl's arms are on the left.

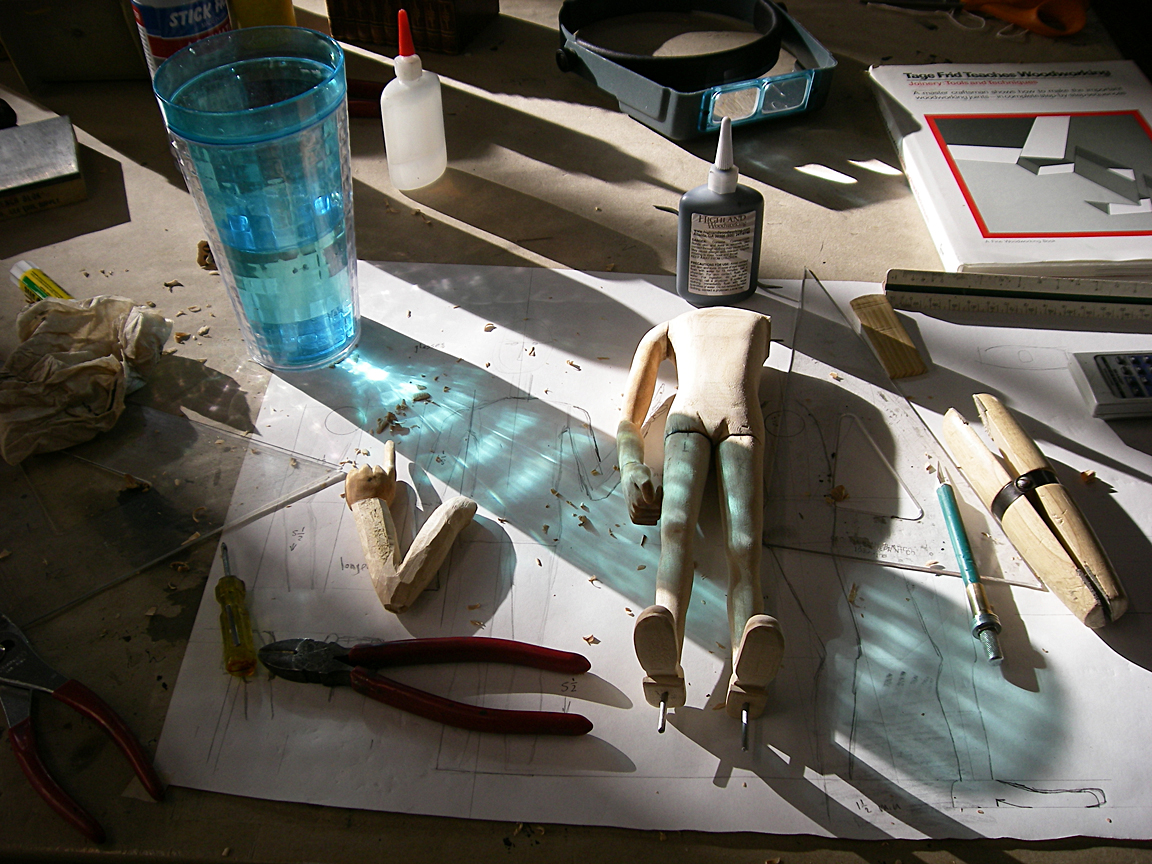
The bodies in progress.

The man's body. I made the bodies and all of the mechanical parts before I made the heads.

The female figure testing out the mechanism. One of the last things I did was to carve the torsos.

The center piece before adding the screen, and before antiquing and painting.

Working out the mechanism and final position of the figures.

The bodies before painting.

The arms and legs in the process of being painted. Because they're part of the mechanism, they all had to be the same size.

All painted, antiqued, and ready to be dressed.


The bodies, all dressed and ready for assembly.

The lady's head. I love how these heads came out.

The man's head.


The floor in-progress. I attached pieces of sheet metal with many small nails.


The metal after the antiquing solution was applied. I love this color - though much of the blue color went away when I applied the wax finish.

The mechanism - simple, straightforward, and made to last.

 The movie..... (watch full screen)

Thanks for looking!

tom


Wednesday, August 1, 2012

"Departure" 2012

I've had this idea in my sketchbook for a while. It's a piece where the figure has an impossible load on his back. In an attempt to balance and secure his cargo - the figure pulls on the ropes, and his load up top shifts from side to side. The piece measures 7" x 31" x 10".

Click on the images for a close look.


A closer shot. His arms pull on the ropes.

view from the back . The motor is hidden in one of the small boxes. It took a while to come up with the configuration of all the elements, and even more time figuring out how to secure them all together.

The top part that rocks from side to side. I used a lot of my favorite found objects here.

So many possibilities - these are the found objects that made the initial cut for this piece.

Here I'm working out the puzzle that is the assemblage of found objects - a very complicated puzzle.

I added lead to the arms, which makes the pulling motion more realistic. After that, I covered up the lead with a homemade mixture of sawdust and wood glue.

Ready for paint. You can see the wires that run up inside his legs up to the motor.

His body after painting and aging - ready to be assembled.

I really like this shot. It shows the 3/16" metal rods and the wires that run up through his legs.

Close up shot of his head. I love his expression.

Adding the figure to the base.

All the weight rests on this found chair, held on with 2 screws.

A detail shot of his shoes. I used an old telephone box as the base. It was already painted black, but I added the metal pieces.


Here's the video - I just edited it together - I never thought it would take 6 years....

Thanks for looking!

tom


Monday, July 30, 2012

Obsolete Show Announced!

I'm very excited to announce my show of new works will open on September 8th at Obsolete in Venice, CA. I will be showing with painter Tyson Grumm, whose work perfectly compliments my own. This will be my second showing at Obsolete - and if the first show is any indication, if should be a smashing success. If you are in the Los Angeles area you should stop by for the opening.


I will be posting more pieces from the show soon.......

Thursday, July 12, 2012

"Swim the Sea" the movie......

I made a movie of "Swim the Sea", it can be seen here and/or here. I tried to post it right on this page but the quality was not good. Enjoy.

Monday, July 2, 2012

"Swim the Sea" 2012

Since I created 5 new figures for our Boxcar Fair video (in 2011), I knew eventually I would incorporate them into new pieces. The High-Diver, (of course this is the swimming version), is first. It seemed an obvious choice to create a fully articulated automaton using this figure.

This piece measures 21" x 33" x 12", and is sold.

Click on images to make them larger.

This wonderfully distressed case was given to me about 5 years ago by 2 good friends in Philadelphia. It must have been sitting outside for a few years - it is perfectly aged, but it needed some nails and glue to hold it firmly together. I thought it would be perfect to house my swimmer marionette. I really wish I could find more pieces like this - I love the look, and all the wood (poplar I think) is very smooth and splinter-free.

BTW Ernie and Brian (2 friends in Philadelphia) have a wonderful eye (eyes?) for all things distressed and beautiful. Check out their furniture, etc here.
 

In it's past life, someone put a coat of turquoise paint on the bottom part of the case. Here I'm stripping away the paint - the color was way too intense for what I wanted this piece to be. I got most of it off, and later, antiqued it down with a wash of raw umber.

Three small lights were put in which will add a warm glow to the underwater scene. A top piece will be added to cover all of this.

The back of the case showing where the mechanism will be hidden.

Testing the layout of the motor, cams, and levers. The piece is powered by a 6 RPM gearmotor, which will move the cams via a 1/8" polycord belt.

The cam stack, before the cams are cut. There's a 3/8" bearing on top and bottom, and a pulley underneath which you can't see in this image.

The 5 levers, each with precision bearings that reduce the friction on the cams.

Here's how I make sure all my levers are perfectly balanced. (Note - I put a piece of masking tape over the hole.) Pieces of lead are added to the short side and holes are drilled in the long side. I figure there will be less wear-and-tear if the levers are balanced. All of the levers I've made in the past were balanced like this.

The 5 cams, all cut and ready to go. You can see the spacers on each cam too.

The cam stack ready for instillation. I saturated the edges of the cams, which are made from lauan, with thin CA glue to make them more durable.

Test fitting the decorative carved basswood pieces before painting.

The decorative pieces after painting. I wanted to create an underwater cavernous feeling similar to the video.

I've never shown this rig before. When we shot the Boxcar Fair video, the marionette had to be operated from the side because it was underneath the main set. I made a trigger-like mechanism that made her arms and legs move simultaneously. Unusual, but it worked great.

Here I'm testing the placement of the figure. Luckily the case is the perfect size for the figure - and visa versa.

I made the mechanism's base hinged on the case so I could gain access to it quickly. This raises the figure up, as you can see. I had a pole on the other side to catch the case and hold it in position. When working on a piece like this, I'm constantly building and testing. I probably tilted this open and closed dozens of times.

Final arrangement of the mechanism. The motor moves the cam stack via the orange belt. The cam stack is held in place with a washer and pin.

The detail of how the levers are stacked. I use a 1/4" steel rod and cut 2 notches for each "E" clip that hold the levers at the proper height. Another standard procedure learned from working on past pieces.

Detail shot of the levers on the cams.

The polyester strings for the figure go up inside the column on the right side of the scene.

I'm about 99% finished with the piece - I plan to add a quote to the "book" up top. You can see how the lights illuminate the scene, and also see the final finish on the base. I will post a final image when it is shot.

Here is a close-up of the swimmer in action. I also will post a movie soon....

Thanks for looking!

tom

Wednesday, June 27, 2012

New piece coming soon.....

Something is happening in the studio...... And it involves the swimmer marionette I made last fall.

More images to come soon.
 

Monday, June 11, 2012

Professor - 2012

A commission from a recent college graduate to be given to his professor, and family friend. He wanted the figure to look like he was teaching, and I think it came out well. It measures approximately 6" x 18" x 4".

Click on images for a larger view.


I started out, as I always do, with an overall drawing. Then it was on to making the torso and legs. Everything is carved from basswood, and pieces are joined with brass rods, held in place with CA glue.

The torso, legs, and shoes are finished, and here I'm working on the position of the arms. I've also chosen the perfect base - a small box that looks like a set of books.

I thought I would show the progression of how the left hand came to be. I sometimes like to go back and see my process myself.

His head is sculpted from polymer clay. To get the head right I looked at a few images on the web, and I think it came out pretty good. Of course anything I create is going to be in my style, so this is a stylized version of the real professor.

The finished body, ready to be painted. At this point I also make the clothes.

The finished piece - he is holding a book labeled, "Business",  (he's a business professor).

A closer view.

His shoes.

While working on the professor one day, the sun came streaming into the studio, and I thought it would make a beautiful image.

More pieces to come........................