Wednesday, September 2, 2015

"Overwhelmed" - Found Object Automaton - 2015

This summer I had a feeling that I wanted to do another complex found object sculpture similar to "Departure". I have collections of many small things, all waiting to be all organized into various sculptures - at least that's how I see it.

Our hero turns his head from side to side as he waves his arms about. "Overwhelmed" can be seen as a metaphor for how our lives get crazy sometimes.

The piece measures 10" x 14" x 10".

This was one of the most complicated puzzles I've ever completed - but I liked the challenge. And it's interesting to me how a piece like this comes together. Sometimes I add a piece, and right away it's perfect for the spot, then sometimes it's quite a conundrum as what piece to add next, and where.

My idea was to give the impression that the figure is standing in the middle of a giant pile of stuff - unable to escape. 
I need to sit down and count the number of things in this pile - it seems like there are a million.

Hidden in the pile are elements of previous pieces. For instance, the small candy jar was left over from "Computation". The globe is a nod to "Wanderlust", and the red chair is reminiscent of "Departure".

The seldom-seen back, which is relatively plain.
Someday, if this piece ever needs to be "serviced", the back section - starting at the 3rd wooden box and going up - can be removed by taking out 2 screws. This way one can access the back of the figure - if ever it needs it.

His expression of 
desperation came out well I think. His head is sculpted from polymer clay.


In-progress pics.....


Planning and drawing. Lots of things needed to be figured out before starting a piece. That's how it always is.

Some simple basswood hands. I say simple because the fingers are straight, and not curled up. Hands can be very challenging to carve, but these were actually fun to make.

Yes, I make mistakes. I added the hands to the arms and I felt they were a bit too short. So I broke them apart, and extended them by about a half inch. Long arms are better than short ones, don't you think?

Initially I was going to build the piece on a base - where I usually hide the mechanisms - but then I realized I could hide it inside the pile of stuff. I like this idea.... a lot.
(And that head is just a stand-in for the real head I will sculpt later.)
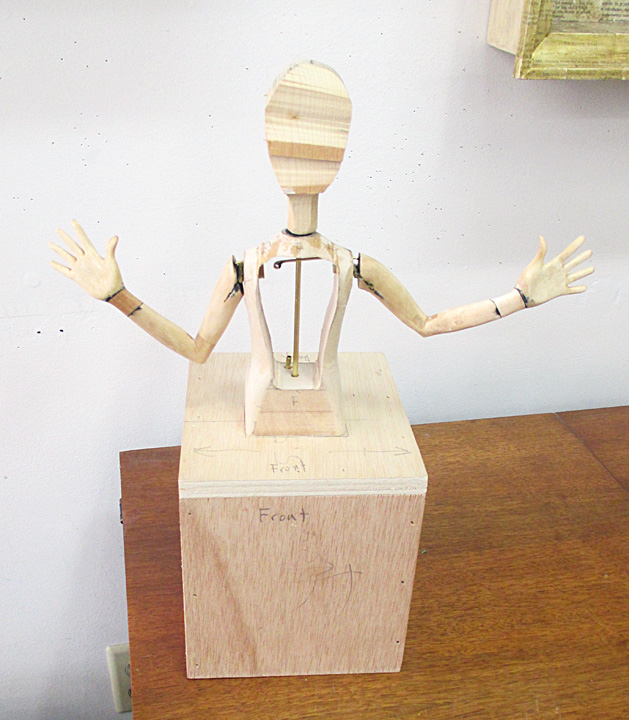
The arms will raise up and down by pulling on the levers. And the head will turn side to side. I used hinges for the pivots at the shoulders again - they work well.

Ready for paint. I also made covers for the front and back of the torso. (This pic actually shows the back - oops.)      

The back - before putting on the cover and sewing him up.

The mechanism in-progress. One cam and lever (shown) for the arms, and one for turning the head. I worked all this out before I began with any of the found objects.

Starting off, I built the box, figured out the figure and the mechanism, and then began covering the box with "stuff". Since I wanted to "hide" the box, I cut away portions of the "add-ons" except where the man's body would be. As you can see, I drew his figure on the box so I knew where to add on each piece without destroying the illusion.


Adding a piece at a time. And each box or tin had to be "filled" with wood to insure I had a solid place to add on the next piece. Most pieces were glued to the original box. 

I worked on top of that piece of wood so the bottom of the piece would be nice and flat.

Another view. To hide the "seam", and to hide any visible part of the box, I painted around where the objects and the box intersected.

 Using smaller pieces, I started to fill in as many of the "holes" as possible.

The mechanism, (seen here without the cam), was built in this almost-too-small space. The big lever controls the hands, and the small one (with the bearing) turns the head. The spring keeps the bearing riding against the cam.

The cam inserted into the mechanism. It was a challenge to build this in this small space - also, it doesn't help that I have overly large hands.

The bottom showing the original box where the mechanism is hidden - and how the other boxes were cut away.


The movie.... (watch full screen).


Thanks for looking!

tom

Sunday, August 9, 2015

"Figures in the Fourth Dimension" - A "Must-have" Book

I am happy to finally be able to announce that the "Figures in the Fourth Dimension"  book is out! And I'm honored to be in it.

The book - thoroughly researched and assembled by fellow kinetic artist, Ellen Rixford - has been published, and it is AMAZING. Ellen has been putting this together for at least 6 years, maybe more, and the thing that impresses me most is her super-thorough attention to detail.  Ellen contacted me back in 2009, and asked not only for great images of my pieces, but also explanations and diagrams of how each piece - and every mechanical component in it - functioned. Ellen, a figurative kinetic artist herself, made sure she understood how every part of a mechanism worked. If there was a question about how a cam or lever worked, I would get an email or a phone call asking me to clarify things. I think her approach was to create a how-to book that would educate a person interested in building mechanical figures - automata, puppets, mechanical figures - but also a beautiful book for anyone interested in the subject. It is awe-inspiring how she, and the other artists in the book, pull back the curtain to reveal how these amazing pieces were created. To my knowledge, there is not a more thorough book out there on this subject. I'm sure anyone interested could spend days delving into the beautiful pages of this coffee table style book - I know I will.

Here are some images for the book ---

The book measures 11.5" x 9", is a whopping 512 pages, and highlights the work of not only automata makers, but puppet makers, and artist who create mechanical figures. Many notable historical pieces are dissected as well......

A page from the section on Chris Chomick and Peter Meder.

A marionette by Phillip Huber.

The wonderful work of Pablo Lavezzari.

The incomparable Keith Newstead.

Ellen's own wonderful work; along with Mayhew Lu.

The creative work of the great Paul Spooner.


As well as the work of other modern artists, many famous historical pieces are also highlighted. This piece by Henri Maillardet at the Franklin Institute in Philadelphia, is similar to the automaton in the movie, "Hugo". Ellen was fortunate that at the time she contacted the folks at the Institute, the piece was being transported to a show and was in pieces for shipment. While the piece was apart, they were able to take rarely seen pictures of the inside, showing the complete mechanism. There is also a thorough explanation (thorough? 34 pages worth!) of how each and every component functions. This alone is worth the price of the book - amazing.


Here are a few pages of the section on my work. Again, I am beyond honored to have my work recognized in this incredible book. 

My piece "Crescendo".

The inner workings of "Lauren & Jordan".

"Wonderlust" explained.

If you haven't already, you can order this amazing book here. I guarantee - it will not disappoint. (When you go to the page, Click the "Contact/Buy" button on the right.) 

UPDATE - Ellen let me know that, "Already Harvard has 2 copies! University of Connecticut has purchased 100 copies for their bookstore, and the Morris Museum is planning to sell it in their bookstore." Great news.

Thanks for looking!

tom

Monday, July 27, 2015

"Petra's Piece" - 2015

This Spring, my wife and I took a trip to Slovenia to meet our friend Petra. A few years back, my wife 'met' Petra in an online class for illustrators, (they are both freelance illustrators for the home decor industry), and they hit it off right away. Petra always said we should come for a visit and she would show us her country. I had never really heard a lot about Slovenia before; it sounded so exotic. My wife and I really love to travel and we had been planning to do this for a few years now. Turns out, Slovenia is an amazing, beautiful gem nestled between Austria, Italy, and Croatia. Since Petra and her family were so generous with their time, (they hosted us for 8 days - they drove us around everyday, and showed us all their favorite places), my wife and I decided to give them a gift equal to their generosity. I posted a few pictures from our trip at the bottom of this post.

As a "Thank You" gift to Petra, Uros, and family, I made this small shadowbox. 
For a while I've been toying with the idea of doing 'group shots' - portraits of multiple figures, concentrating of the faces and the juxtapositions of the group. This seemed like the perfect opportunity to try out my idea. I really like how this turned out. It took extra time to get the faces right, but it was worth it.

A side shot to show the depth. The piece measures 10" x 8.5" x 4" and sits on a shelf or can be hung on the wall. The box was made from salvaged wood.

             Petra and Uros.
             Tim and Sophie.


Starting out with the polymer clay sculpting. My reference pics are on the left.

I developed the 4 heads concurrently, so their sizes were proportional.


I mounted the figures to a small board before placing the whole assemblage into the shadowbox. That way I could get the placement correct, and then just glue the whole thing into the shadowbox. Their bodies are pieces of pine.

One last shot before I put them in the shadowbox.

More about Slovenia..........

Map of Slovenia.

My travel pics, in no particular order......

Beautiful mountains in the western part of the country.

Hiking near the Julian Alps.

The Škocjan Caves. (Can you see the man in this pic?)

A church on Lake Bohinj.

 Lake Bled - a must-see. (I didn't take this shot.)

Ljubljana, the capitol of Slovenia.

 Napoleon's Bridge over the Soča River.

 The Soča River. Yes, that's the real color - amazing.

The Soča River.

A small town on the Soča River, where we stopped for cappuccinos.

Piran, on the Adriatic Sea.

I have more pictures from our trip here if your interested. More? Yes, 223 more.

Also, whenever we travel to Europe, we always go by Rick Steves' recommendations - and we always have an amazing time. Here is his program on Slovenia.....

Go see Slovenia, you will not be disappointed. And the people are wonderful.

Thanks for looking.

tom

Thursday, July 9, 2015

"Fearless" Shadowbox - 2015

Here is "Fearless", my latest shadowbox - which really turned into a labor of love. Since I wanted to put the figure in this kind of dress, I had to spend a lot of time carving her basswood body - much more than I would if I was covering her body with clothes.
And I had this idea of placing the figure up on top of the shadowbox for a while, and I really think it turned out well.
The shadowbox is made from scratch, and the ladder and mirror are found objects. I added a little paint to the mirror but left the ladder as I found it - it was perfect as is.
The frame and the interior of the shadowbox were decoupaged with pages from vintage books, then the frame was painted with a wash of metallic gold acrylic paint, and the whole piece was distressed in my usual fashion.

The piece measures 16.5" x 23" x 5.5" and hangs on the wall. The piece is signed and dated. And is sold.

With this piece I wanted to stick with a limited color palette, and keep the scene pretty simple.

She appears to look down from her perch. (I thought about calling her "Plucky" or "Moxie", but I had already used those titles on previous pieces.)

I was pretty happy with the way her body came out. It's so much easier to cover my figures up with clothes, but this dress really seemed to be the perfect fit for her. Her clothes were made by me - the lower part of her dress is actually a vintage handkerchief my wife had. 

I made her head and face purposely elongated; to go along with her long limbs.

Details of the frame, her leg, hand, and the ladder. I put her in tights so I didn't have to worry about carving her toes, plus it goes with her outfit.

The mirror, slightly distressed.

In-progress pics.....

My drawing for her body. I purposely wanted her arms and legs to be elongated, and stylized/idealized - like a fashion model.

Fitting the figure to the frame - making sure she sat on the top properly. The shadowbox is also in-progress here.

Fitting her arm to her torso. I wanted her hands to be right on the edge of the frame, so I had to do some reverse engineering here.

The figure is finished and ready to be painted. I really had to hide the seams of her neck and arms; usually they are covered with clothing. I made her neck out of wood this time so I could carve it down where needed.

In the middle of my painting process. The two brass pins will hold the figure in place.


Thanks for looking!

tom