Wednesday, December 2, 2015

Yes, I'm Obsessive - An Introspection

I've been thinking a lot about my work lately. Maybe it's because of my recent apprentice-teaching duties where I had to verbalize all my creative thoughts and decisions; who knows? But something I've never pointed out before - and I think it's a significant part of every piece I make - is my obsession over my surfaces. I love a buttery-smooth surface.

I think this penchant of perfectly smooth surfaces first developed during the 'Materials and Processes' classes I took back in my days studying Industrial Design. My M&P professor would obsess over a smooth, perfect surface. He knew if he closed his eyes, and inspected it with his fingers, he could tell if a student put the time and energy into giving the prototype, or model, a perfect surface. I try to create that same experience. I love the smoothness of a painted surface after a good measure of fine sanding. Also, a good coat of Johnson's Paste Wax is the perfect finish, and probably adds to the buttery-ness.

I also love texture. And I love when multiple textures show up on the surface of a piece. Now I'm not talking about a tactile texture - I mean textures that results from the combination of.... the grain of the wood, the application of the paint, and the texture created by the wash of aging liquid, (which usually runs down into every minute crevice). After I obsessively sand over all of this, what results is an unpredictable, and most often, a beautiful, dynamic surface. A surface that looks textured but is actually very smooth.

Here's an example from my piece, "Au Contraire". This is the back of the elephant, showing all the rasp marks, sanding marks, and paint and age variation. And yet with all this going on - and after it was all sanded - what results is a smooth, touchable surface. Love.

Here's a shot of the floor and the shoes of my piece, "Wasted & Wounded". The floor has added texture because I (roughly) went over it with a hand plane to level out the surface. The plane added a lot great surface marks to the wood. After painting and aging, this was all smoothed out with lots of sanding, and finished with a coat of wax - hand rubbed to perfection.

Even on my oddball creations like this memory jug, I try to create a very touchable surface. This makes sense here because everything is done with one's fingers. Smoothing things out is a big part of the process.


Sadly, our phones and computer screens can not really convey the smoothness of these surfaces. People usually understand this obsession better once they've handled one of my pieces. Not that I want people handling my pieces - but it just goes to show the level of finish I put into every piece.

Here I am finely sanding the surface of a wall on a recent commission.....


And of course, this obsession spills over to all of my work - on the surfaces of my polymer clay heads, and on any mechanical parts, (cams, followers, levers, axles, etc. etc.) that have to be perfect.

The obsession continues.........

Thanks for looking, and happy sanding!

tom

Monday, November 9, 2015

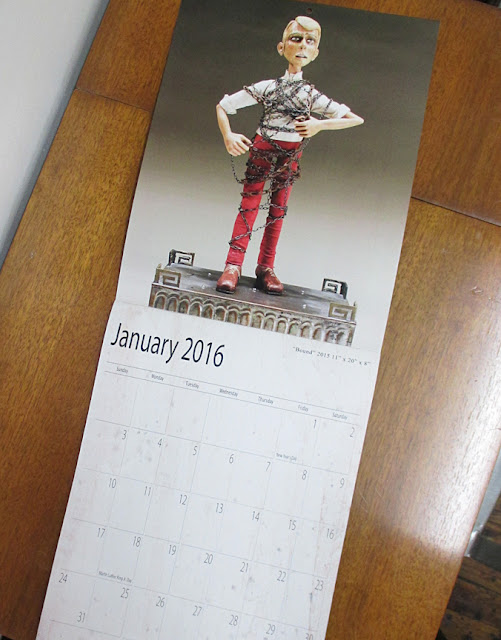
2016 Calendars are now out!

I'm happy to be able to offer these calendars again this year. (For many years in the past, I haven't found the time it takes to put one together) This second year, things were a bit easier, and it only took 3 days to get it ready for printing. The 2016 calendar contains 8 new high quality photographs of my new automata pieces created since last year's calendar - and 4 of my favorite images from last year.

This is definitely a unique calendar & makes a perfect gift for any fan of Automata, Wood Sculpture, Art Sculpture, and the Handmade Art world.

This is a Limited Edition Calendar using high quality printing, and includes my artist signature..... so get yours today - last year's edition sold out quickly.

Available here on my Etsy site for $30. Now $25 USD. Free shipping to US. Shipping worldwide.

Here are a few images for this year's calendar.
https://www.etsy.com/listing/207171584/tom-haney-2016-wall-calendar-8-12-x-22?


Thanks for looking!

tom

Friday, October 30, 2015

My Danish Apprentice - September '15

Back in April (of 2015) - and out of nowhere - a young woman from Copenhagen emailed me and asked me if I could teach her what I do. I've only had one other teaching session with a student from Asheville, NC - a one day thing, so I wasn't sure if this was for me. After thinking about it, and discussing it with my wife (of course), I decided it might be a fun challenge. Originally, (my apprentice) Laura wanted to come for 90 days because that was the longest visa she could get. I said I could teach her what I know in a month. So we planned on her coming for the month of September - when it's not too hot or too cold in Atlanta.

When I told my friends and family I was getting an apprentice, most people thought it was like an internship, where she would be working for me. Since I understood the European concept of apprenticeships, and had to tell them that she was not working for me, but that I would be teaching her how I create my artwork.

So she was here, staying with us, for the whole month of September. I've never thought of having an apprentice, (it's not a thing here in the US), and I discovered what it must feel like to be a teacher. 

The first week was spent taking apart some of the pieces I had here, and showing her the basic principles of mechanisms. Once she understood the basic concepts, she began to make her own piece. Besides teaching her mechanisms, I was also teaching her how to (safely) carve wood. She apprenticed for 4 years with the oldest Danish furniture maker in Copenhagen, Rud Rassmussen, so I knew she had good woodworking skills. Carving is another thing. And it has to be done safely - I wanted her to leave here with 10 fingers after all. 

Here are some pictures from our time together, and a rare glimpse into my sunny studio in Atlanta......

This is me teaching her how I carve.  
I've never talked so much - and it was interesting to verbalize my creative process, to think of things I've never thought of before, and to examine exactly why I do things a certain way.

Laura's work table. I brought in some of my older pieces, and collected lots of reference books for her to look through.


She decided her first piece would be an articulated raven, with wings that flap. Here she is figuring out the bird's proportions and how to make the wings move.

Her reference material, and the carved bird in progress.

Her mechanism in progress. It's a motor-driven cam and lever system. The lever will pull down on the small rods on the wings; making them go up and down.  

 The final piece - it worked really well, and her carving, and her attention to detail, were impressive.

Happy apprentice.

Working in the wood shop. You can see my tools are sized for my 6' 4" stature.

The next piece she did was a fully articulated figure, in the style of my "Mr. Oddball" piece shown above. She drew it all out, and started carving. I showed her how I did my connections and joints.

Her figure in progress - hand-carved from basswood.

She got this far before time ran out. The figure is a female boxer with an alien's head. The two levers out front operate the arms. She disassembled this piece but took the figure with her, and I'm sure it will show up in some future piece of hers.

One night she was nice enough to make us a delicious pasta dish, with garlic bread - so good.

Here she is off to her next adventure - she'll spend the month of October with another automata artist in Japan, Kazuaki Harada.
I was so impressed by Laura's willingness to learn, her sense of adventure, and overall pleasantness. I couldn't have asked for a better apprentice. She's a hard worker, tidy, and fun in the studio. All-in-all it was a really great experience. I guess you never know, but we all got along so well. My wife and I hope to visit her in Copenhagen sometime soon.

Thanks for looking.

tom

Wednesday, September 2, 2015

"Overwhelmed" - Found Object Automaton - 2015

This summer I had a feeling that I wanted to do another complex found object sculpture similar to "Departure". I have collections of many small things, all waiting to be all organized into various sculptures - at least that's how I see it.

Our hero turns his head from side to side as he waves his arms about. "Overwhelmed" can be seen as a metaphor for how our lives get crazy sometimes.

The piece measures 10" x 14" x 10".

This was one of the most complicated puzzles I've ever completed - but I liked the challenge. And it's interesting to me how a piece like this comes together. Sometimes I add a piece, and right away it's perfect for the spot, then sometimes it's quite a conundrum as what piece to add next, and where.

My idea was to give the impression that the figure is standing in the middle of a giant pile of stuff - unable to escape. 
I need to sit down and count the number of things in this pile - it seems like there are a million.

Hidden in the pile are elements of previous pieces. For instance, the small candy jar was left over from "Computation". The globe is a nod to "Wanderlust", and the red chair is reminiscent of "Departure".

The seldom-seen back, which is relatively plain.
Someday, if this piece ever needs to be "serviced", the back section - starting at the 3rd wooden box and going up - can be removed by taking out 2 screws. This way one can access the back of the figure - if ever it needs it.

His expression of 
desperation came out well I think. His head is sculpted from polymer clay.


In-progress pics.....


Planning and drawing. Lots of things needed to be figured out before starting a piece. That's how it always is.

Some simple basswood hands. I say simple because the fingers are straight, and not curled up. Hands can be very challenging to carve, but these were actually fun to make.

Yes, I make mistakes. I added the hands to the arms and I felt they were a bit too short. So I broke them apart, and extended them by about a half inch. Long arms are better than short ones, don't you think?

Initially I was going to build the piece on a base - where I usually hide the mechanisms - but then I realized I could hide it inside the pile of stuff. I like this idea.... a lot.
(And that head is just a stand-in for the real head I will sculpt later.)

The arms will raise up and down by pulling on the levers. And the head will turn side to side. I used hinges for the pivots at the shoulders again - they work well.

Ready for paint. I also made covers for the front and back of the torso. (This pic actually shows the back - oops.)      

The back - before putting on the cover and sewing him up.

The mechanism in-progress. One cam and lever (shown) for the arms, and one for turning the head. I worked all this out before I began with any of the found objects.

Starting off, I built the box, figured out the figure and the mechanism, and then began covering the box with "stuff". Since I wanted to "hide" the box, I cut away portions of the "add-ons" except where the man's body would be. As you can see, I drew his figure on the box so I knew where to add on each piece without destroying the illusion.


Adding a piece at a time. And each box or tin had to be "filled" with wood to insure I had a solid place to add on the next piece. Most pieces were glued to the original box. 

I worked on top of that piece of wood so the bottom of the piece would be nice and flat.

Another view. To hide the "seam", and to hide any visible part of the box, I painted around where the objects and the box intersected.

 Using smaller pieces, I started to fill in as many of the "holes" as possible.

The mechanism, (seen here without the cam), was built in this almost-too-small space. The big lever controls the hands, and the small one (with the bearing) turns the head. The spring keeps the bearing riding against the cam.

The cam inserted into the mechanism. It was a challenge to build this in this small space - also, it doesn't help that I have overly large hands.

The bottom showing the original box where the mechanism is hidden - and how the other boxes were cut away.


The movie.... (watch full screen).


Thanks for looking!

tom

Sunday, August 9, 2015

"Figures in the Fourth Dimension" - A "Must-have" Book

I am happy to finally be able to announce that the "Figures in the Fourth Dimension"  book is out! And I'm honored to be in it.

The book - thoroughly researched and assembled by fellow kinetic artist, Ellen Rixford - has been published, and it is AMAZING. Ellen has been putting this together for at least 6 years, maybe more, and the thing that impresses me most is her super-thorough attention to detail.  Ellen contacted me back in 2009, and asked not only for great images of my pieces, but also explanations and diagrams of how each piece - and every mechanical component in it - functioned. Ellen, a figurative kinetic artist herself, made sure she understood how every part of a mechanism worked. If there was a question about how a cam or lever worked, I would get an email or a phone call asking me to clarify things. I think her approach was to create a how-to book that would educate a person interested in building mechanical figures - automata, puppets, mechanical figures - but also a beautiful book for anyone interested in the subject. It is awe-inspiring how she, and the other artists in the book, pull back the curtain to reveal how these amazing pieces were created. To my knowledge, there is not a more thorough book out there on this subject. I'm sure anyone interested could spend days delving into the beautiful pages of this coffee table style book - I know I will.

Here are some images for the book ---

The book measures 11.5" x 9", is a whopping 512 pages, and highlights the work of not only automata makers, but puppet makers, and artist who create mechanical figures. Many notable historical pieces are dissected as well......

A page from the section on Chris Chomick and Peter Meder.

A marionette by Phillip Huber.

The wonderful work of Pablo Lavezzari.

The incomparable Keith Newstead.

Ellen's own wonderful work; along with Mayhew Lu.

The creative work of the great Paul Spooner.


As well as the work of other modern artists, many famous historical pieces are also highlighted. This piece by Henri Maillardet at the Franklin Institute in Philadelphia, is similar to the automaton in the movie, "Hugo". Ellen was fortunate that at the time she contacted the folks at the Institute, the piece was being transported to a show and was in pieces for shipment. While the piece was apart, they were able to take rarely seen pictures of the inside, showing the complete mechanism. There is also a thorough explanation (thorough? 34 pages worth!) of how each and every component functions. This alone is worth the price of the book - amazing.


Here are a few pages of the section on my work. Again, I am beyond honored to have my work recognized in this incredible book. 

My piece "Crescendo".

The inner workings of "Lauren & Jordan".

"Wonderlust" explained.

If you haven't already, you can order this amazing book here. I guarantee - it will not disappoint. (When you go to the page, Click the "Contact/Buy" button on the right.) 

UPDATE - Ellen let me know that, "Already Harvard has 2 copies! University of Connecticut has purchased 100 copies for their bookstore, and the Morris Museum is planning to sell it in their bookstore." Great news.

Thanks for looking!

tom